Advanced Lighting Tutorial - How to Balance Lights When Shooting Video in Low Light
Shooting video in low light is one of the fastest ways to make your footage look amateur, harsh highlights, dark muddy backgrounds, and zero atmosphere. The good news? You don’t need more lights to fix this. You need light balancing.
In this tutorial, I’ll walk you through a practical, real-world lighting setup that transforms flat, rookie lighting into a cinematic, balanced image, using camera settings, filters, and light control instead of brute force brightness. I’ve been working in the industry for over 20 years, let me show you a simple technique that can make a big difference.
📸 This video was filmed using the RF 16mm f2.8 STM
📸 The Key light used for this Tutorial was the GVM SD650B
Table of Contents
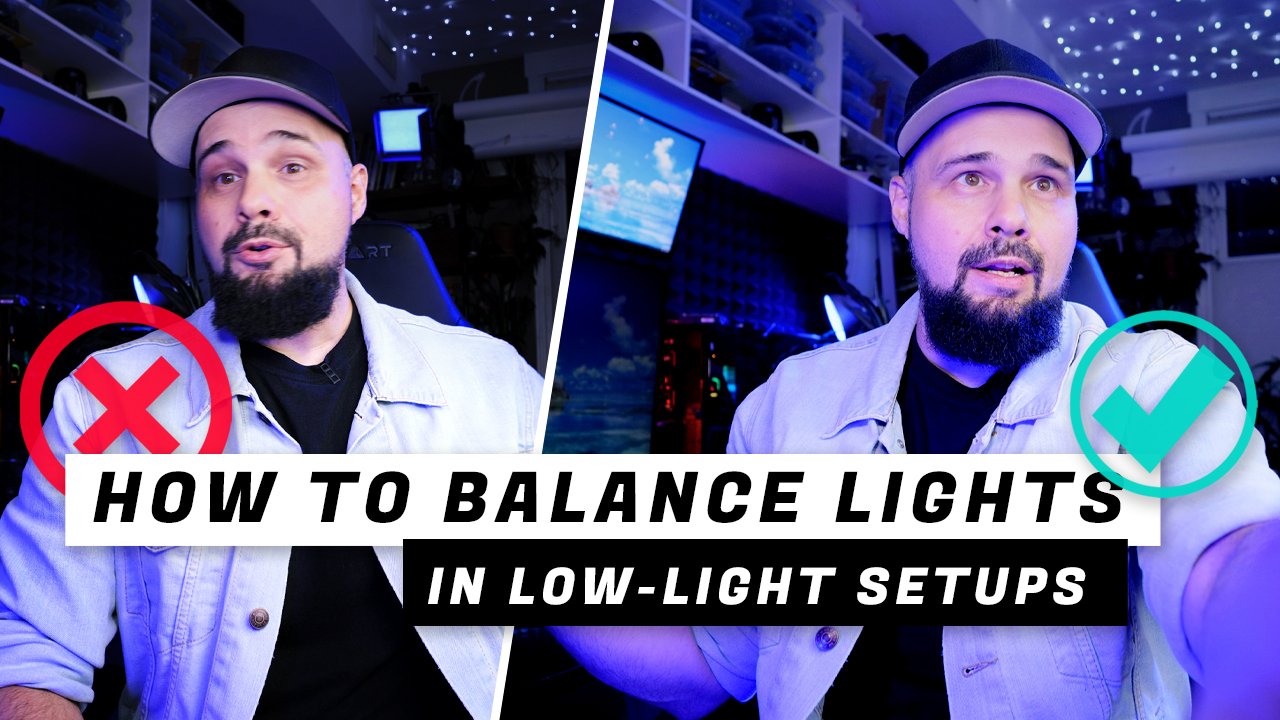
What “Bad” Low-Light Lighting Looks Like
A common beginner setup looks like this:
Subject is brightly lit
Background is dark, flat, and lifeless
No depth, no atmosphere, no separation
This kind of lighting might work for horror films, but for YouTube, interviews, or talking-head videos, it kills visual interest. Viewers click away faster when there’s nothing visually engaging on screen. I see this so often on YouTube. People think because it’s dark they need more light when in fact the opposite is true.
Why Background Light Matters in Video
Background light adds:
Depth and separation so your subject doesn’t look like they are stuck in a black box.
Texture and atmosphere giving a more pleasurable and possibly emulsive feel/mood to your composition.
A more professional, cinematic look which is always appreciated. Keep viewers hooked on your videos longer with eye candy.
Even subtle background illumination makes a massive difference in perceived video quality.
Thinking About Light as “Volume”
A simple way to understand lighting is to think of it like sound volume. This is how I learned to understand lighting and maybe it might help some of you out there too.
Your key light (on your face) = loud
Background light = quiet
If the subject is extremely “loud” and the background is barely audible, the image feels unbalanced. The goal is not equal brightness, but balanced presence. Let’s say you have a band your key light is the vocals and your background light is the guitar. If the guitar is too loud it hides the vocals. On the other hand if the guitar is too quiet its annoying and distracts from the vocals. So what you want to the vocals to stand out with the guitar adding ambiance and pace but without overpowering the vocals. Try to keep that reference in mind when you’re creating your next lighting setup.
Common Beginner Mistake: Keeping ISO Too Low
Many beginners obsess over keeping ISO as low as possible for a “clean” image. And yes that’s a good thing when the situation allows for it but if you’re shooing in low light you’re going to have to bump up that ISO.
Example rookie logic:
“I’m shooting in low light, so I’ll keep ISO at 100 or 200 for the best quality and just increase the power of my light.”
This actually prevents the sensor from seeing background light at all. Remember the previous example about balancing the vocals with the guitar. Low ISO and a bright light aren’t the right choice for low light shooting.
Camera Settings Used in This Setup
Starting settings (before fixing the lighting):
ISO: 200
Aperture: f/5
Shutter Speed: 1/50 (for 24p video)
Lens: Canon 16mm f/2.8 STM
These settings heavily favor the subject and starve the background of exposure.
Why You Should Use an ND Filter Indoors
ND filters are often called “sunglasses for your lens.” by YouTubers which is a terrible analogy but I guess it makes it easy for people to understand. Using an ND filter indoors sounds insane, until you understand why it works.
A Variable ND (VND) lets you:
Increase ISO sensitivity
See background light
Control highlights without blowing out your face
High-quality true color ND filters prevent color shifts (green, magenta, warm casts). If you want to see my blog post on the NiSi True Color Filters check this out.
Final Adjustments: Seeing Monitors and Practical Lights
If practical lights or monitors disappear (turn black) Adjust the VND filter until they’re visible again. This might make your exposure too bright or too dark but you can compensate by adjusting your light output. You can also stop down aperture if needed (e.g., f/2.8 → f/3.5) This keeps the scene readable while preserving atmosphere.
Balancing Exposure the Counterintuitive Way
Here’s the exact process I used in the video for correcting the exposure:
Add a Variable ND filter
Increase ISO from 200 → 800
Open aperture from f/5 → f/2.8
Lower key light power dramatically
Use the ND filter to fine-tune exposure
Light is setup to feather light onto me while shooting most of the light beam at the background
This allows the sensor to “see” light bouncing off the background while keeping highlights under control.
Using a Black Mist Filter for Atmosphere
A Black Mist filter is used to subtly soften digital video and add a more cinematic feel by creating halation, or a gentle glow around bright highlights. This glow helps highlights roll off more smoothly instead of clipping harshly, while also softening skin tones in a natural, flattering way. Black Mist filters come in different strengths, 1/8, 1/4, 1/2, and 1, with higher numbers producing stronger diffusion and glow. For most YouTube videos, interviews, and talking-head shots, a 1/8 Black Mist is the ideal choice, as it adds atmosphere and mood without making the image look overly soft or stylized. Don’t be that guy who uses a 1/2 strength filter for your YouTube content because you think it looks cool. To people in the industry it just creams “I don’t know what i’m doing”
The gold standard in the video industry when it comes so subtle atmospheric diffusion is the Tiffen Black Pro Mist 1/8th filter. If you’re thinking of buying a Black Pro Mist filter keep in mind that there is also a Pro Mist filter without the word “black” in it. They produce slightly different effects so keep that in mind.
Lighting Theory Explained Simply
Here’s what’s happening physically:
Light hits my face and background. Two targets with one light. But most of the light’s power is pointed at the background.
Light closer to the camera (reflecting off my face) is stronger because of the shorter distance traveled and thus less light needs to be used on me.
Light traveling farther loses intensity (light falloff). So a majority of the light output is pointed at the background. By the time it travels to the background and back to the camera sensor it’s intensity should have dropped off to the the point were it is slightly less intense then the lighting reflecting off my face. Again think if light as volume. The farther the speaker the father sound has to travel and the quieter it gets.
Increasing ISO lets the sensor detect the weaker light bouncing off the background.
ND filters tames highlights without killing shadows. this prevents my face from being blown out.
This is light balancing, not just exposure. Hope you learned something new. This is where lighting gets fun.
Final Before-and-After Results
Before:
Overexposed subject
Dark background
No depth or mood
After:
Balanced subject exposure
Visible background detail
Cinematic glow and separation
Professional visual presence
All without adding more lights.
Key Takeaways for Low-Light Video Lighting
Don’t fear higher ISO indoors
Yes you can use ND filters even in dark rooms
Lower light power instead of blasting brightness
Balance subject and background exposure
Add mist filters for cinematic texture
Think in light balance, not exposure triangles
🤓 💡 Read Next:
🚀 EQUIPMENT USED TO MAKE THIS VIDEO
Canon EOS R5 - https://amzn.to/3snWNve
Canon RF 16mm f2.8 STM - https://amzn.to/44wGDUp
⭐ NiSi True Color VND - https://amzn.to/3YbYL29
NiSi Swift Filter Kit - https://amzn.to/3OsGCJT
K&F Concept 82mm Variable ND Filter - https://amzn.to/3uTcgVR
⭐ Tiffen Pro Mist 1/8 - https://amzn.to/3uYDXMs
GVM PRO SD650B - https://amzn.to/3LbLnac
Neewer 36” Softbox - https://amzn.to/3snYqZS
Neewer 660 RGB LED Light - https://amzn.to/3trqcpY
Sennheiser AVX ME2 LAV - https://amzn.to/2T2kj5D